
Crown molding on cabinets does one thing better than almost any other finishing detail, for real.
It helps a kitchen look intentional, not like it just kinda ended at the ceiling line.
Without it, your cabinets end up being more or less boxes that stop short and then… there’s that awkward gap. With crown, the whole setup reads like built-in furniture. The weird space above the cabinets basically fades away, and the room feels finished in a way that is honestly hard to put into words until you actually see it done right.
Installing crown molding on cabinets is a job that most folks can do on their own, honestly. It really needs patience, a decent miter saw, and, you know, that habit of measuring twice before you commit to any cut. If you’ve been sitting there thinking about how to install crown molding on kitchen cabinets so it doesn’t look amateurish, then this little guide shows you the whole thing, from the planning part all the way up to the final caulk, little by little.
What You Need Before You Start
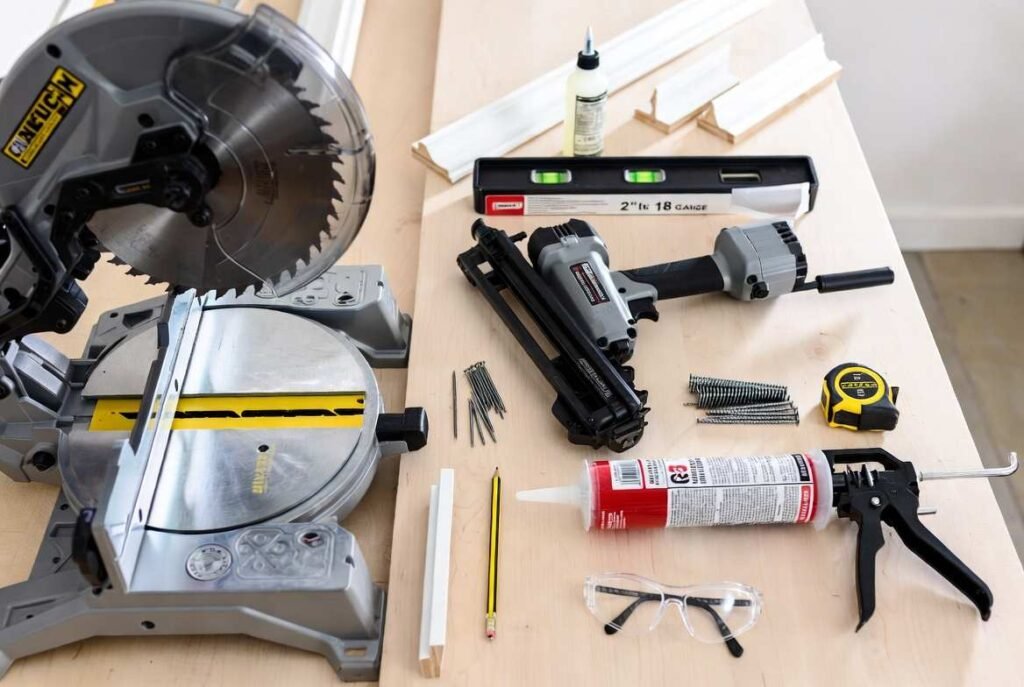
Get everything together before you touch a single piece of molding. Running to the hardware store mid-project breaks your focus and usually leads to mistakes that cost more time than the trip itself.
Tools and materials:
- Miter saw with a fine-tooth blade for clean cuts
- Brad nailer loaded with 2-inch 18-gauge finish nails
- Wood glue for corner joints and anywhere two pieces of molding meet
- Stud finder to locate wall studs behind the upper cabinets
- Caulk and a caulk gun for gaps at the ceiling line and along the face frame
- Tape measure, pencil, and a reliable level
- Scrap pieces of molding for practicing cuts before you touch the real stock
On nail sizing, 2-inch 18-gauge brad nails work well for most crown molding on cabinets installations. At outside corners where two molding pieces meet, use something slightly shorter so you do not blow through the face of the molding.
Build a Nailing Strip Before Anything Else
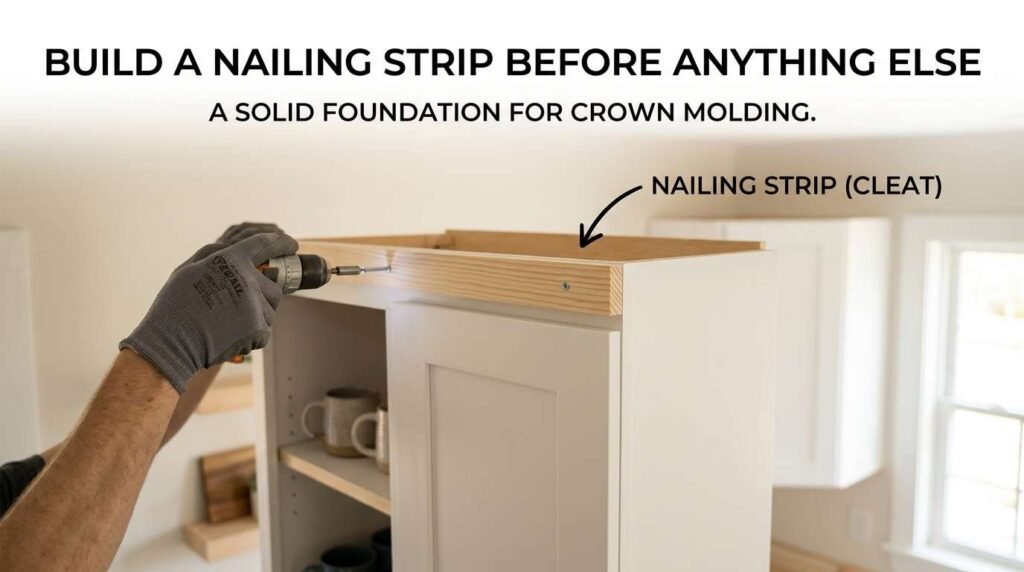
This is the step most DIY guides skip. It is also the step that makes everything else work properly.
A lot of people ask do you nail crown molding directly to cabinets. The answer is no, not if you want it to stay put. The top of a cabinet does not have enough material to hold nails reliably over time. Without something solid behind it the molding will flex, pop loose, or crack at the joints within a year or two.
A cabinet crown molding nailing strip, sometimes called a cleat, fixes this. It is a piece of wood fastened to the top of the cabinet that gives the molding a real surface to nail into.
How to build and attach a nailing strip:
- Rip a strip of plywood or solid wood at the same spring angle as your crown molding profile
- The spring angle on most residential crown molding runs at 38 or 45 degrees
- Attach the nailing strip to the top of the face frame on each cabinet run using screws
- Make sure it sits level even if the tops of your cabinets are not perfectly flat
- Use your stud finder to find wall studs where the strip meets the wall so you get solid fastening points behind the cabinets
Once that nailing strip is in place you have something real to work against. Every nail you drive through the crown molding will hit solid material instead of thin cabinet top.
Picking the Right Molding Profile
Choose a profile that fits your kitchen style before you buy anything.
A simple cove crown molding works in most kitchens and is the most forgiving to cut and install. More ornate profiles with multiple curves look richer but are significantly harder to cope at an inside corner. If this is your first time with cabinet crown molding, start simpler.
Scale matters too. A large bold molding on short cabinets looks heavy and wrong. A thin flat molding on tall cabinets looks like an afterthought. Hold a piece of the actual molding up against your cabinets in the store or before you buy the full run. What it looks like in context is all that matters.
How Do You Cut Crown Molding for Cabinets
This is where most people get stuck and waste the most material.
Crown molding sits at a spring angle between the cabinet and the ceiling. It is not flat against either surface. That angle is what makes the cuts feel backwards the first time you do them.
You can cut crown molding flat on the miter saw table with the molding lying at its spring angle against the fence. Or you can cut it upright against the fence with the top edge flat on the table. Flat on the table is easier for beginners to repeat consistently.
Understanding the difference between coping and mitering crown molding before you start cutting saves a lot of wasted stock.
A miter cut means cutting both pieces of molding at matching angles so they meet cleanly at the corner point. It works well at an outside corner and looks sharp when done right. At an inside corner though mitering is risky because gaps open up as the wood moves with temperature and humidity changes through the seasons.
A cope cut means cutting one piece square to the wall and then cutting the second piece to follow the exact profile of the first. It takes more time and practice but the joint stays tight even as the wood moves. Use cope cuts at every inside corner and miter cuts at every outside corner. That combination gives you the tightest result on a real kitchen installation.
Installing the Molding Step by Step
Nailing strip is in. Cuts are planned. Now you actually put crown molding on kitchen cabinets.
- Start at the most visible wall first. Usually that is the wall you see when you walk into the kitchen. Cut that first piece square on both ends if it runs wall to wall, or square on one end and mitered on the other end if it turns a corner.
- At an outside corner, cut both pieces at 45 degrees in opposite directions so they meet at the point of the corner. Apply wood glue to the joint before you nail anything. That glue does more to hold the outside corner together long term than the nails do.
- At an inside corner, cut the first piece square and butt it into the corner. Cut the second piece with a cope cut so it overlaps the profile of the first piece. Test the fit before you nail. A cope cut that is close but not perfect can be cleaned up with a coping saw or a small rasp.
- Drive nails through the molding using the brad nailer at the top edge into the nailing strip and at the bottom edge into the face frame. Two nail lines keep the molding flat and tight against both surfaces. You nail through the crown molding into the nailing strip, not into the cabinet top directly.
Scribing to an Uneven Ceiling
Older homes especially have ceilings that are not flat or perfectly level. That gap between the top edge of the crown molding and the ceiling is one of the most common problems with installing crown molding on cabinets in existing homes.
Scribing is how you fix it. Hold the molding in position and use a compass or scribing tool set to the width of the widest gap you can see. Run it along the ceiling while it marks a line on the molding below. Take the molding down, cut to the scribed line, and reinstall. It will follow the ceiling exactly.
If the gap is small, a clean caulk line after installation handles it fine. If the gap is large, scribe it. Caulk over a large gap shrinks, cracks, and looks bad within a year. Fix it properly or it will keep reminding you that you did not.
Finishing It Off
Once all the molding is up and nailed, go back and set any nail heads sitting proud of the surface using a nail set.
Fill them with wood filler if you are painting. Use a colored putty stick that matches the wood if you are staining.
Caulk the top edge where the molding meets the ceiling. Use a paintable latex caulk and tool it with a wet finger for a clean line. Caulk the bottom edge where the molding meets the face frame if any gap is visible there.
Let everything dry fully before you sand. Sand lightly if needed. Then prime and paint or apply your topcoat finish.
When the Cabinets Underneath Are the Problem
Crown molding installation sometimes reveals issues with the cabinets themselves. Doors that do not close right, boxes that are out of square, face frames that were never properly level.
If you run into that during DIY crown molding cabinets work, get it properly assessed before finishing the trim. Working with experienced cabinet makers in Idaho Falls who can look at the full installation tells you what actually needs fixing rather than covering up a problem that gets worse over time.
Corner Cabinets and Crown Molding Planning
Crown molding decisions connect directly to how your cabinet layout handles corners.
Blind corner cabinet placement, cabinet height, and whether to run molding above the refrigerator all link together. If you are working through a full kitchen layout and corner cabinets are part of it, looking at blind corner cabinets before the crown molding conversation starts means you are not making one decision that boxes in another.
Garage Cabinets and Finishing Details
Crown molding is mainly a kitchen conversation but finishing details come up in garage cabinet planning more than people expect.
If you are working on garage storage alongside a kitchen project, browsing garage cabinet ideas first gives you a clear picture of what works in that space before you commit to a layout or a finish approach.
Is DIY Crown Molding Cabinets Worth It?
For most people yes.
The tools are not expensive. The materials are forgiving enough that small mistakes get fixed with caulk and filler. The learning curve is real but manageable if you take your time on the cuts and do not rush the corner joints.
Where people get into trouble is rushing. A cope cut that is off by a degree. A nailing strip that is not quite level. A miter cut that is close but not right. These compound on each other fast.
Slow down at every step. Crown molding on cabinets is one of those finishing details people notice without knowing exactly what they are noticing. They just know the kitchen looks right. That is the whole point.
FAQs
How do you install crown molding on kitchen cabinets?
Build a nailing strip at the top of the cabinets first. Cut molding using miter cuts at outside corners and cope cuts at inside corners. Nail through the molding into the nailing strip at the top and into the face frame at the bottom. Caulk gaps, fill nail holes, and finish.
What size nails do you use for crown molding on cabinets?
2-inch 18-gauge brad nails work well for most installations. Use slightly shorter nails at corners where two pieces of molding join together.
Do you nail crown molding directly to cabinets?
No. Build a cabinet crown molding nailing strip first and nail into that. The top of a cabinet does not have enough material to hold nails reliably long term.
How do you cut crown molding for cabinets?
Use a miter saw set to the spring angle of the molding. Miter outside corners and cope inside corners for the tightest and most durable joints.
What is the difference between coping and mitering crown molding?
Mitering cuts both pieces at matching angles so they meet at the corner point. Coping cuts one piece to follow the profile of the other. Coping works better at inside corners because the joint stays tight as wood moves seasonally.